DMX Basics
DMX is short for digital multiplexer, which is a universal protocol designed for
the lighting industry allowing for controlling of intelligent fixtures like
scanners, moving heads, LED par cans, dimmer packs, fog machines etc.
DMX allows you to control many fixtures channels, normally up to 512 with
varying channels from 0-255 (0-100%).
This will give control of channels like gobo selection, up and down
movements, colours and dimming etc.
DMX is a very good system as all this information can be sent down one cable,
used in conjunction with a DMX controller with memory all your channel
settings can be saved and recalled easily.
DMX was designed so that all manufacturers can use the same
protocol/language to control their fixtures allowing the end user to use any
make of fixture on their DMX controller as long as both are DMX compatible,
and the controller has enough channels to control the fixture that is attached.
Fixtures have an input and output DMX socket, allowing you to connect from
the controller to the first fixture then from that fixture to the next (this is
called daisy chaining).
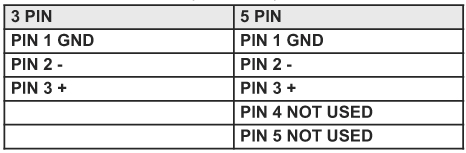
Sockets are normally 3 pin XLR but can be 5 pin XLR as well.
DMX fixtures need to have a DMX address set, so they can then decode the
correct information from the controller. This is either set with a digital display
panel, where the address can be changed by up and down buttons, or by a
row of small switches, called dip switches; there the required address is set as
a binary number. The address ranges from 1-512.
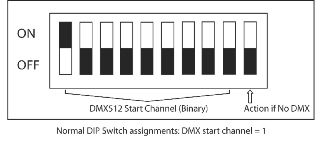
To work out your dip switch settings you can simply download a DMX
calculator from the internet or see our table further on.
The order in which fixtures are connected in a DMX line does not influence
the DMX address, a fixture set to DMX address 1 can be put in a DMX line
from beginning, middle or end, as it is set to address 1 it knows to take
information from that point onwards.

DMX Wiring
DMX connections are usually made via XLR connectors. 3 Pin wiring and
connectors are more common, but using 5 pin connectors is better practice,
expecially in large systems, although the extra connections are often unused.
It is worth checking the manual for your fixture, as some lights use the extra
pins for low voltage control. 5 Pin connectors remove the confusion over
mixer leads and DMX leads in big rigs. Sending a mixers 48v phantom power
down a DMX cable could damage the DMX light!
When making cables try and use good quality DMX cable and do not connect
Pin 1 GND to the outer casing of the connector as you might do with audio
cables as this may cause erratic behaviour from your fixture.
Do not make Y leads to split cables to fixtures; always use the in and out
sockets or a DMX splitter as again this may cause erratic behaviour from your
fixture.
We recommend you to put a DMX terminator in any fixture which hasn’t got a
DMX lead connected from the output socket to another fixture; this again is
to reduce erratic behaviour from your fixtures. A DMX terminator is simply a
male XLR plug with 120 ohms, ¼ watt resistor soldered across pin 2 & 3.
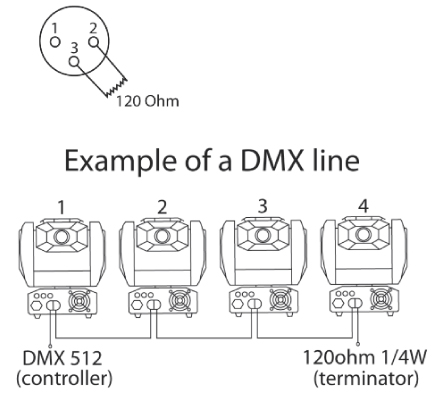
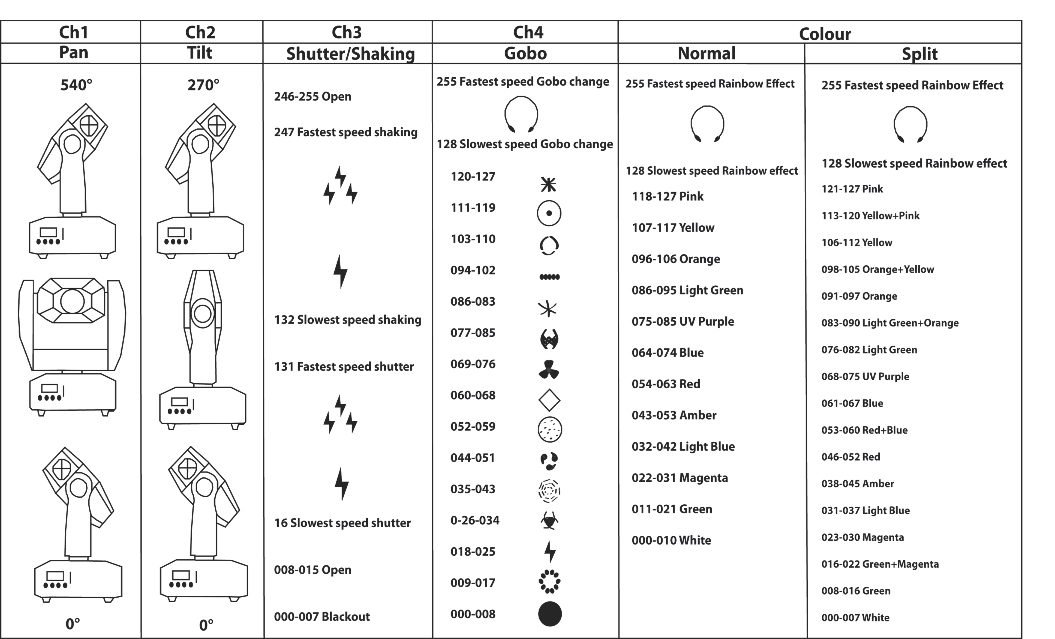
Here is an example with each fixture taking up 5 DMX Channels (See Above)
The controller is a Cobra CONTROL24. So you have a cable from the controller
to the first fixture cable, from first to second and so on, the last light has a
DMX terminator plugged in.
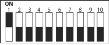
Fixture 1 would be set to DMX address:
(1) dipswitch number 1 on.
----------------------------------------------------
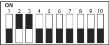
Fixture 2 would be set to DMX address:
(6)dipswitch numbers 2 & 3 on.
----------------------------------------------------
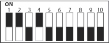
Fixture 3 would be set to DMX address:
(11) dipswitch numbers 1, 2 & 4 on.
----------------------------------------------------
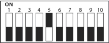
Fixture 4 would be set to DMX address:
(16) dipswitch number 5 on.
----------------------------------------------------
We would recommend you to fully read manuals for your light and controller
as some controllers tell you what each fixture address needs to be, and some
lights need other settings changed to make them work.
When setting addresses you need to make sure fixtures don’t overlap from
one to the next.
You can set 2 fixtures to the same address, and as long as they are the same
fixture (i.e. same channel layout) they will then do the same as each other