Wiring Audio and Lighting Connectors
Shown here are some standard conventions for connecting audio cables to various connectors. While these are followed by most
manufacturers you can never be completely sure that these rules have been adhered to. Always check the instruction manual for
each piece of equipment you are using or check with a qualified sound or lighting engineer for correct wiring configurations.
Buy ready made leads or make them yourself with the aid of simple hand tools and a soldering iron
Balanced Microphone and Equipment Linking
These configurations are for low level signals, so they are used for interconnecting amplifiers and mixers, input leads for connecting microphones and anywhere where a low level signal needs to be connected to another piece of equipment. The Ground pin (1) can be connected to the body of metal plugs. The cable has two cores with a braded or shield wrapped around the inner cores. This style of connection will keep external noise to a minimum, with the balancing actioncancelling out noise and hum.
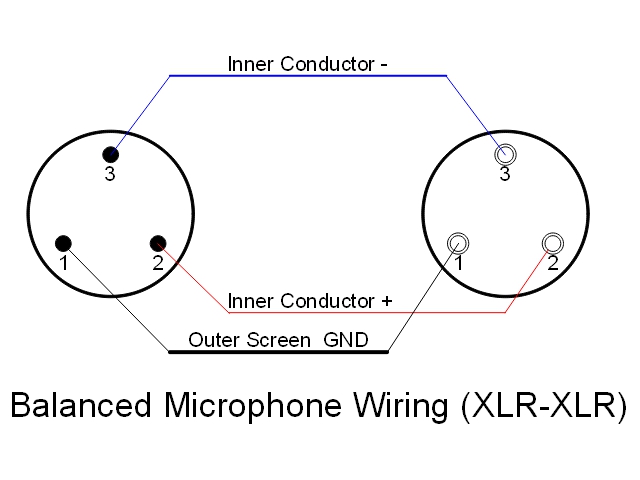
Balanced Microphone and Equipment Linking
This is an alternative arrangement for connecting Microphones to mixers or interconnecting other equipment at signal level. The balanced cable has two cores with a braded or shield wrapped around the inner cores. This style of connection will keep external noise to a minimum, with the balancing actioncancelling out noise and hum.
.jpg)
Unbalanced Microphone Connection
If you wish to connect an unbalance microphone to a mixer imput you can use this connection configuration. Pin 1 and 3 are linked in the plug to acheive the correct connection.
.jpg)
Line Level Link Lead (Phono/RCA - Phono/RCA)
Used for line and turntable level signals to mixers and inteconnection between equipment. These cables are often found in domestic equipment.
.jpg)
Line Interconnection XLR - Phono/RCA
Used for line and turntable level signals to mixers and inteconnection between equipment. Pin 1 and 3 are linked in the plug and this will allow you to connect a phono output directly to a balanced input.
.jpg)
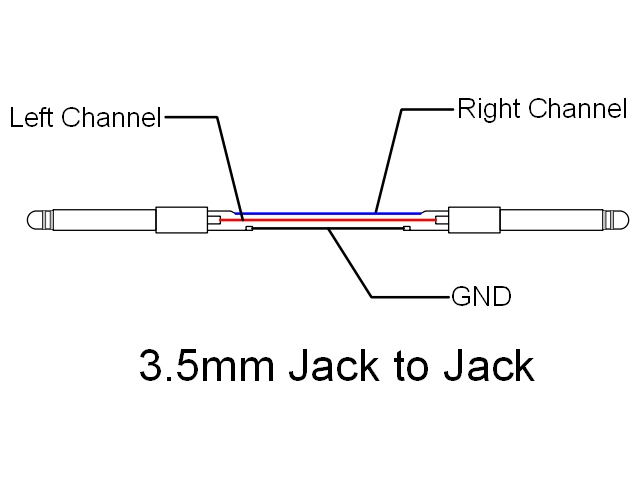
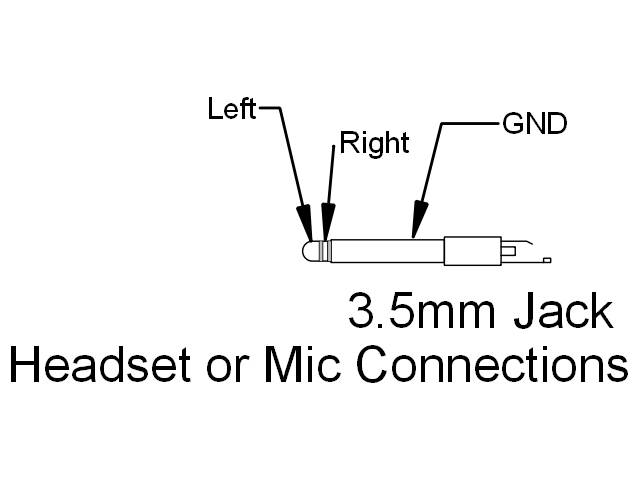
3.5mm Jack Connections
3.5mm Jack connectors are now a popular form of audio connector, with various formats and connections, depending on the application. The standard stereo connecting lead will generally do the job, but wont accommodate, microphone and control connections found on phones, so although the audio will pass through, control will be lost. Select a screened cable if you are connecting to low level line inputs. The diagrams here show the standard connections for common applications.
.jpg)
.jpg)
Combining Stereo to Mono
If you are combining the two parts of a stereo signal to mono, then you can use the attached configuration or buy a suitable adaptor. The resistors included in the circuit will help mix the two signals without overloading the signal source or causing distortion. The levels will be somewhat reduced and this circuit is not suitable for headphones.
.jpg)
Effects Send Return
Send return connections from a mixer to an effects unit will often require a splitter lead going from stereo jack to mono jacks or two XLR connectors. The accompaning diagrams show these connections and will be suitable for insterting effects machines in many mixer circuits.
.jpg)
.jpg)
Speaker connections
Loudspeakers will often be connected with the same connectors as line level signals, but the voltage and current in the cable is much increased, so much thicker cable is needed. The cable is normally two core and has no earth shield. 4 core cables are sometimes used but this is rare and normally used for Bi wiring, where the middle and high frequencies are split from the bass. Speaker connections are only used after the amplifier, so amplifier to speakers. As a general rule speaker cable should be as thick as is reasonably practical and the greater the distance between the amplifier and speakers, the thicker the cable. Thin speaker cable cause power loss and reduces the amplifier damping effect, so bass can sound muffled or woolly. For normal PA systems of a few hundred watts use 1.5mm cable up to 20m and 2.5mm between 15 to 40m. The best way to think about it, try never to use less than 1.5mm cable and always buy the thickest cable you can afford. There are obviously more technical ways of working out cable losses and so on, but this is meant as a general overview. XLR and jack connectors are often used for lower power equipment and pin 3 is mostly left unused. It is wise to check the instruction manual to ensure that standard connection protocol has been observed. For most systems +1 and -1 connections are used on speakon connectors, so if you buy a standard pre-made cable it will only have 2 cores connected to these terminals. This is a standard convention, although its worth checking the equipment instruction manual. If you need to use all four connections, look for pre-made cable specifically indicating that all contacts are connected or construct your own cable.
.jpg)
.jpg)
.jpg)
DMX lighting connections
DMX cables look like microphone cables but in fact the cable impedance is different, microphone cable impedance is 80 ohms and DMX is around 120 Ohm. This is a technical point and the correct cable should be use to ensure that the control data is not corrupted. DMX cable normally has an extra metal film shield. Both internal cables are used to send different signal information, so they should not be interchanged. 3 And 5 pin XLR connecters are the standard terminations for DMX connectors. Two of the connections in 5 pin connector are normally not used, but you should check the manual for each piece of equipment just in case. Most pre-made 5 pin leads have all the pins connected and its worth checking if you think they are or may be necessary. Using all the leads allows for some extra functions on more advanced equipment and if the options is there its probably worth using five pin leads to future proof your equipment. Unlike audio the ground pin should not be connected to the connector casing on XLR leads.
.jpg)
.jpg)
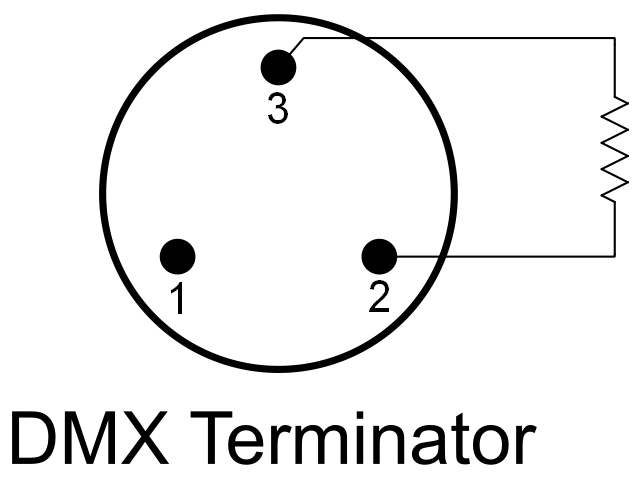
DMX Terminator
A DMX terminator with a 120 ohm resister soldered across pin 2 and 3 has to be connect to every independent chain. This is plugged into the last DMX unit in the line, the one furthest away from the controller. This is an essental last piece to the DMX chain and will ensure the DMX line is functioning correctly.